Help & How Tos

How to Create Crayon Soaps

Article

How to Create Crayon Soaps
With school right around the corner, why not make these awesome homemade soap crayons to celebrate the start of a new school year? This fun DIY soap crayons tutorial is a simple way to create a wonderful gift for your child's teacher or to help make your kids squeaky clean just in time for school. This project will bring out the little kid in all of us!I'll be using the new Natural Melt & Pour soap base for this tutorial, along with a crayon soap mold that perfectly shapes these soap crayons for a colorful bath time experience. Microwave Microwave-safe glass containers Sharp knife to cut soap into cubes Spray bottle with rubbing alcohol Butter knives Nitrile gloves Disposable pipette Thermometer to monitor soap temperature Natural Melt & Pour soap base Gel soap colorants in Green, Orange, Purple, and Magenta Children's Room Fragrance Oil Jumbo Crayon Soap Mold (five 2-oz cavities) Step 1:Cut up approximately 12 ounces of Natural Melt & Pour soap base into small cubes and set them aside.Step 2:Using a microwave-safe container, melt approximately 2 ounces of the cut-up soap base in the microwave using 15-second bursts until melted. This is a small amount of soap, so it will melt quickly. Be careful not to burn or boil the soap, as this will result in a rubbery, poor-quality soap. If there are any small chunks left, stir slowly; the heat from the soap will melt the remaining pieces.Step 3:Add 3 drops of Orange Gel colorant to the melted soap base and stir slowly until mixed well. This is where your soap crayons will start to take on their vibrant color.Step 4:Using a disposable pipette, add 1 ml of Children's Room Fragrance Oil. Stir slowly until mixed well.Tip: Always stir slowly when adding colorants, fragrance oils, or any type of additions to the soap base to avoid creating excess bubbles in your soap crayons recipe.Step 5:Use a thermometer to monitor the soap temperature. It should be around 130° – 135°F to avoid warping your crayon soap mold. If the soap base is too hot, stir it slowly until it cools to the desired temperature.Step 6:Using the 5-cavity Jumbo Crayon Soap Mold, pour the orange soap slowly into one cavity. Remember to pour slowly to avoid excess bubbles.Step 7:Spritz the soap with rubbing alcohol to get rid of any bubbles that formed while you were pouring.Repeat Steps 2 – 7 with different colors, creating a rainbow of DIY soap crayons. Each cavity holds 2 ounces of soap.Step 8:For a purple crayon, I added 3 drops of Purple Gel Colorant and 1 ml of Children's Room Fragrance Oil. Stir slowly and pour into the mold cavity.Step 9:Next, I made 2 crayons in green. I used 4 ounces of soap base, 6 drops of Emerald Green Gel Colorant, and 1.5 ml of Children's Room Fragrance Oil. Stir slowly and pour into the cavity.Step 10:The last crayon I made was in magenta. I used 2 ounces of soap base, 3 drops of Magenta Gel Colorant, and 1 ml of Children's Room Fragrance Oil. Stir slowly and pour into the mold cavity.Step 11:Wait 2 – 3 hours for the soap to completely harden.Step 12:Once hardened, turn the mold over and slowly press on the underside to release the soap.Tip: If the soap won't come out, wait another 1/2 hour or so. You can even pop the mold in the freezer for 5 minutes, but avoid leaving it in longer.Tip: If you'd like to make all of your soap crayons in one color, simply use 2 ounces of melted soap base for each cavity and color accordingly. The beauty of making DIY soap crayons is that the recipe is easily customizable! You can use any gel soap colorant of your choice to create a rainbow of colors, and you can even try different fragrance oils to make each crayon soap unique. With the flexibility of this crayon soap recipe, you'll find it's simple to adjust based on your preferences.Want to know how to make soap crayons in bulk for gifts or party favors? Just scale up the ingredients and get creative with colors and fragrances. This homemade soap crayons project is also a fun and educational craft for kids, giving them a hands-on activity that results in personalized, playful bath time products. Soap crayons make bath time fun! Unlike traditional crayons, these crayon soaps don't color your bathtub – there is no color transfer. They simply help encourage kids to wash up while making the experience playful. Whether you are gifting them to teachers, using them as party favors, or simply making them for your own household, learning how to make soap crayons is an exciting project for all ages.
How to Make Slanted Layered Soap

Article

How to Make Slanted Layered Soap
By slanting the soap mold, you can achieve a different look to layered soaps. You can also achieve a gorgeous visual appeal by layering colors – you can choose bright colors or different shades of the same color for a subtle effect. In this soap making tutorial, we've chosen to do a brown soap which will complement fragrance oils containing patchouli, sandalwood, earthy type scents, and scents with notes of wood. The colors chosen will also make a nice masculine soap when paired with a masculine scent. Read on to learn how to make layered soap…with a slant! Creating a visually appealing and aromatic layered soap involves selecting the right colors and scents. For this tutorial, we are using: Aborigine Amber Mica: This mica gives a light brown hue perfect for the first layer. Moonkissed Night Mica: A darker brown mica that complements the lighter shade and adds depth to the soap. Patchouli Oud Wood Fragrance Oil: This fragrance oil provides a rich, earthy scent that pairs well with the brown color scheme, ideal for a masculine soap. These colors and fragrance oils not only create an attractive soap but also ensure a delightful scent experience. Follow these step-by-step instructions to achieve beautifully slanted layers in your soap:Supplies and Equipment Needed: Microwave-safe glass containers (2) Sharp knife to cut soap base into cubes Butter knives Rubber gloves 2 small hand towels Spray bottle with rubbing alcohol Flexible 12 Bar Silicone Mold (12 cavities, 4 oz each) Disposable pipette 16 ounces Ultra Clear Melt and Pour Soap Base Thermometer Aborigine Amber Mica Moonkissed Night Mica Patchouli Oud Wood Fragrance Oil .15 cc Scoop Step 1:Add two .15 cc scoops of the Aborigine Amber Mica into a microwave-safe glass container. This will be the light-colored brown. For tips on how to incorporate Micas into melt & pour soap base, see the How to Use Mica Colorants in Soap tutorial.Step 2:Add 8 oz of Ultra Clear Melt and Pour soap base into the container and melt the soap base in a microwave for 30 seconds. Repeat if necessary but don't boil or burn the soap.Step 3:Stir slowly until the mica and soap are well mixed.Step 4:Add 4 ml of Patchouli Oud Wood Fragrance Oil and stir until everything is blended well.Step 5:To create a tilt to the mold, place one end of the mold on top of a small rolled towel. You can place another rolled towel in front of the other end to prevent the mold from moving (make sure the bottom of the soap cavity on this end is resting on the counter and not on the towel). This will create the first slanted layer.Step 6:Slowly pour about 1.5 ounces of soap into the tilted mold – just enough to cover the bottom. Spritz the soap with rubbing alcohol to remove bubbles.Step 7:It is important not to touch the mold – let soap sit for 15 minutes to form a hardened layer. If the layer is not firm, then a wavy line may form in the finished product. Press gently with a finger to test. If able to form a dent, wait another minute or two. The layer should be able to support the second layer without bowing inward.Step 8:While the first layer is hardening, repeat Steps 1 – 4 using 8 ounces of Ultra Clear Melt and Pour soap base, 2 scoops of Aborigine Amber Mica, and 2 scoops of Moonkissed Night Mica (this will create a darker brown) and 4 ml of Patchouli Oud Wood Fragrance Oil. Stir thoroughly.Step 9:When the first layer is set, turn the soap mold around and tilt it in the opposite direction.Step 10:Spritz the first layer with alcohol. This will help the layers adhere to each other.Step 11:Use a thermometer to ensure the soap is not too hot to prevent the first layer from melting into the second layer. The best pouring temperature is 135 to 140 degrees. Make sure the soap mold doesn't move and slowly pour about an ounce of the soap into each cavity. Spritz with alcohol to remove any bubbles that may have formed.Step 12:Let the soap sit for 15 to 20 minutes to form a hardened layer.Step 13:Make sure the layer is hardened sufficiently to take the 3rd pour. Spritz the soap and repeat Steps 9 – 12 using the light brown soap. Spritz with alcohol and let the soap harden.Step 14:Make sure the third layer is hardened sufficiently to take the fourth pour. Lay the soap mold flat against the table. No need to tilt the mold for the final layer. Spritz the third layer with alcohol and pour the remainder of the dark brown soap. Spritz again and let harden.Step 15:Let the soap completely cool and harden before removing it from the mold.By following these steps, you can create stunning slanted layered soap that not only looks great but smells fantastic too. Enjoy your soap-making adventure!
How to Make Homemade Bath Bombs?

Article

How to Make Homemade Bath Bombs?
Bath bombs are a luxurious addition to any bath, releasing delightful scents, skin-softening oils, and a fizzy effervescence that enhances the bathing experience. While store-bought bath bombs can be convenient, making your own at home is a fun, customizable, and cost-effective way to enjoy these little spheres of relaxation. In this guide, we'll walk you through how to create homemade bath bombs from scratch, so you can pamper yourself with spa-like treatments whenever you want. There are many reasons why making your own DIY bath bombs is a rewarding experience: Customization: When you make your own bath bombs, you can choose your favorite scents, colors, and skin-nourishing ingredients, tailoring each one to your personal preferences. Cost-Effective: Homemade bath bombs are far more affordable than buying high-end options from stores, especially when you make them in batches. Natural Ingredients: Store-bought bath bombs can sometimes contain synthetic dyes and fragrances. By making them at home, you have control over using natural and skin-friendly ingredients. Creative Expression: Crafting bath bombs allows for creativity—you can make them as simple or as elaborate as you want, experimenting with different shapes, colors, and additives. To get started on your homemade bath bomb recipe, you'll need a few key ingredients. Most of these are easy to find and might already be in your kitchen pantry: Baking Soda (Sodium Bicarbonate): This is the primary ingredient that gives bath bombs their fizz when they hit water. Citric Acid: This reacts with baking soda to create the fizzy effect. It's a common ingredient in canning and preserving, available at most grocery stores or online. Cornstarch: This adds structure to the bath bombs and helps to slow down the fizzing reaction for a more prolonged experience. Epsom Salt (or Sea Salt): Adds soothing properties to the bath, relaxing muscles and softening the skin. Carrier Oil: Adds moisture to the bath bomb and helps bind the dry ingredients together. Popular choices include coconut oil, almond oil, or olive oil. Water or Witch Hazel: Just a small amount is needed to bind the ingredients together. Witch hazel is often preferred as it evaporates more quickly, preventing premature fizzing. Essential Oils: These provide natural fragrance to your bath bombs. Lavender, eucalyptus, and citrus oils are popular choices for relaxation. Colorants (Optional): If you want to add a splash of color, you can use natural powders like mica, food-grade colors, or even beetroot powder for a natural hue. Before you begin crafting, make sure you have the right equipment on hand: Mixing Bowls: You'll need a couple of large mixing bowls to combine dry and wet ingredients separately. Whisk or Spoon: A whisk is great for thoroughly combining the dry ingredients. Bath Bomb Molds: These come in various shapes and sizes, but classic round molds are the most popular. Silicone molds or even cupcake tins can work in a pinch. Spray Bottle: This will allow you to add water or witch hazel slowly to avoid prematurely activating the fizzing reaction. Gloves (Optional): Wearing gloves can help protect your hands from the citric acid, especially if you have sensitive skin. Mix the Dry Ingredients: In a large bowl, whisk together 1 cup of baking soda, ½ cup of citric acid, ½ cup of cornstarch, and ½ cup of Epsom salt until fully combined. Combine Wet Ingredients: In a separate bowl, mix 2 ½ tablespoons of melted carrier oil (like coconut oil), 1 teaspoon of water or witch hazel, and 10-15 drops of essential oil. If you want to add color, this is the time to mix in your chosen colorant. Slowly Combine Wet and Dry Ingredients: Gradually pour the wet ingredients into the dry ingredients, stirring continuously. The key is to do this slowly to avoid the fizzing reaction. If the mixture starts to clump but isn't too wet, you're on the right track. Test the Consistency: The mixture should feel like damp sand and hold its shape when squeezed. If it's too dry, lightly spray a bit more water or witch hazel until it reaches the right consistency. Fill the Molds: Pack the mixture tightly into your molds. Overfill them slightly, then press the two halves together firmly if using round molds. Let Them Set: Allow the bath bombs to set in the molds for at least 24 hours. Once hardened, carefully remove them from the molds and let them air dry for another 12-24 hours before use.
Round Ball 2¼" Silicone Soap Mold Video
Article

Round Ball 2¼" Silicone Soap Mold Video
The Crafter's Choice 2.25" round soap mold is a popular choice among aritsants looking to make unique designs. It is the perfect size for a bar or can be embedded into a loaf of soap. This video demonstrates how to use the Crafter's Choice - Round Ball 2¼" Silicone Soap Mold (1801). At the end of the video we give you some fun creative soaps that can be made using this mold!
Making Milkshake Soap

Article

Making Milkshake Soap
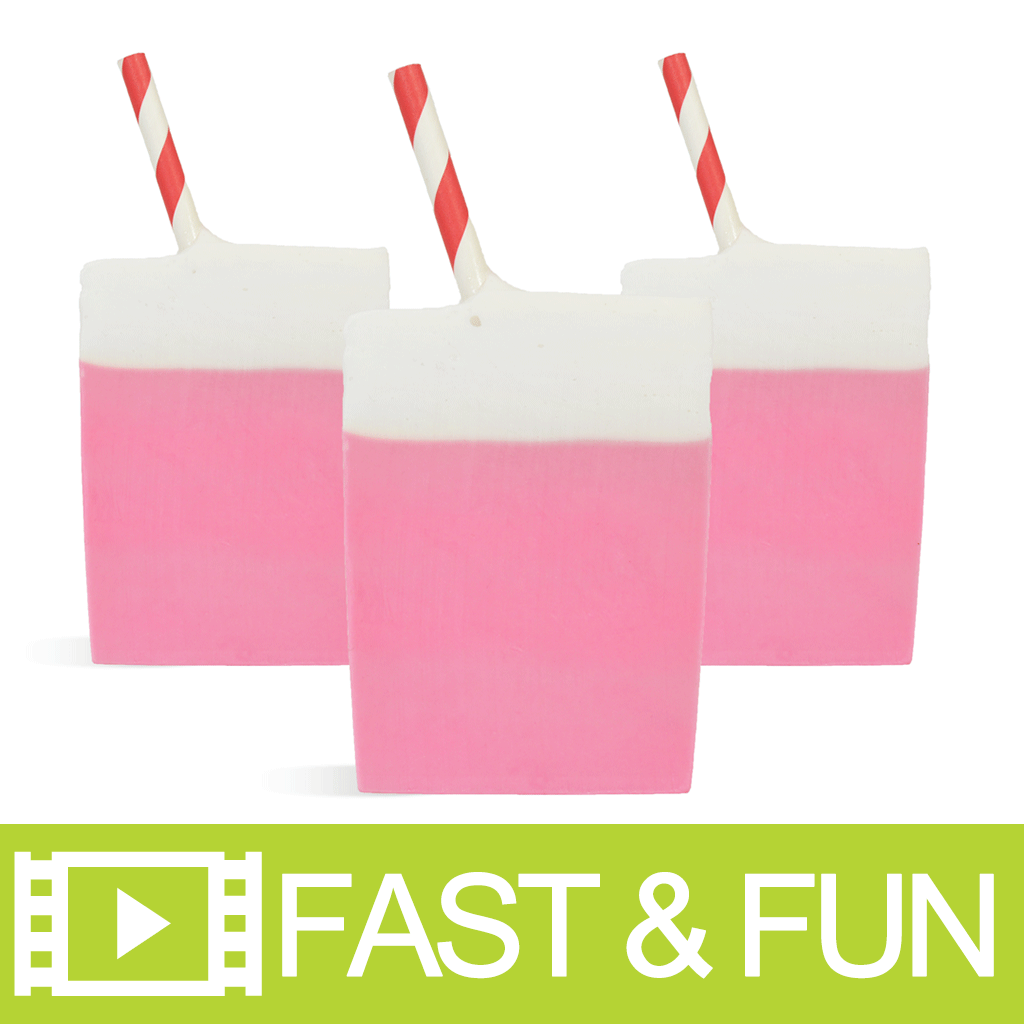
Learn to make these Strawberry Milkshake MP Soap bars!  They look and smell good enough to eat but please don't because they are soap! Scented with Sweet Strawberry and topped off with an adorable red paper straw.
Learn to Make: Lip-Gloss

Article

Learn to Make: Lip-Gloss
Lip-gloss is fun and easy to make. It varies from lip balm in that it is usually colored and softer than lip balm as it doesn’t usually contain wax. Castor oil gives it shine and mica/pigments give it color.
Learn to Make: Whipped Lip Butter

Article

Learn to Make: Whipped Lip Butter
Hydrate and soften lips with whipped lip butter.
Melt and Pour Soap Additives Guide

Article

Melt and Pour Soap Additives Guide
Choosing additives in melt and pour soap is easy with Wholesale Supplies Plus. Our guide to melt and pour additives will make your next batches thrive.
Pet Shampoo (from a base) -Simple Steps for Beginners
Article

Pet Shampoo (from a base) -Simple Steps for Beginners
This helpful guide will show you 'How To Make' Pet Shampoo using simple steps for beginners. 
Making Vanilla Lavender Linen & Room Spray

Article

Making Vanilla Lavender Linen & Room Spray
Making Vanilla Lavender Linen & Room Spray is easy and fun! This spray is the perfect scent to freshen bed linens or makes for a great room spray. The vanilla lavender fragrance not only smells lovely, but it is naturally odor neutralizing!
Detailing Soap Molds Video

Article

Detailing Soap Molds Video
Learn how to colorize the ornate details of Milky Way® Molds in this short 'Simple Secrets' video. We use plastic droppers to carefully bring the designs to life, and provide tips and tricks for decorating soaps. Filling the nooks of these detailed molds with vibrant colors will attract customers to your handmade soap bars.
Chocolate Face Mask Recipe Video

Article

Chocolate Face Mask Recipe Video
This video demonstrates how to make Chocolate Face Mask packets. This face mask includes cocoa powder, illite clay, colloidal oatmeal, and yogurt powder - a wonderful combination that is thought to help soothe and rejuvenate tired skin. This chocolate face mask is a perfect stocking stuffer or holiday gift. Customers and friends will love the special facial treat after spending time in the cold. A wonderful recipe for chocolate lovers looking to beautify and pamper their skin!